Understanding client side routing by implementing a router in Vanilla JS

When working with single page application frameworks, the routing is usually handled by some routing module or package. For many developers, how this routing actually works is something of a mystery.
The purpose of this article is to help developers to gain a better understanding of how client side routing works in frameworks such as Angular, React and Vue by implementing this functionality themselves in Vanilla JS.
We will start by taking a look at what client side routing is. Next, we will build a simple application with basic client side routing in Vanilla JS. Finally, we will think about the more advanced features that we usually see in client side routing packages, and implement one of them ourselves - parameterised routes.
The code for the completed client side routing demo application can be found in this Github repository.
Also, as a disclaimer, let me state once again that more than anything else this article is just intended to help you understand how client side routing works - for production code you are usually best off just using the router package or module which comes with your framework of choice.
If after reading this article you are interested in building more things with Vanilla JS, I highly recommend this Udemy course (affiliate link):
20 Web Projects With Vanilla JavaScript
What is client side routing?
Client side routing is a type of routing where as the user navigates around the application or website no full page reloads take place, even when the page’s URL changes. Instead, JavaScript is used to update the URL and fetch and display new content.
We can by more specific and pin down the exact behaviour that we have grown to expect from a single page application with routing.
- When the application is first loaded, the route which is loaded and the content displayed are determined by the URL path.
- When the user navigates around by clicking a link within the application, the URL changes. Without a full page reload, a new route with new content is loaded, based on the new URL.
- When the user navigates by clicking the browser forward/back buttons, they move back or forward through the routes that they previously visited.
Implementing client side routing
If we think about implementing an application with the above behaviour ourselves, there are two main technical challenges which we are confronted with:
- How do we change the URL without causing a page reload, and also preserve the behaviour of the browser forward/back buttons?
- How do we map any given URL to the appropriate template (or component)?
The answer to question 2 is more complicated and depends on exact requirements - we will look at implementing an algorithm which can do this later on.
As for changing a URL without causing a page reload, we will use a method on the history api called pushState.
history.pushState
The history.pushState method is part of HTML5 and is supported by all modern browsers. It allows you to push an entry to the browser’s history object, specifying a state object for passing data to the new history entry, a title, and the URL for the history entry.
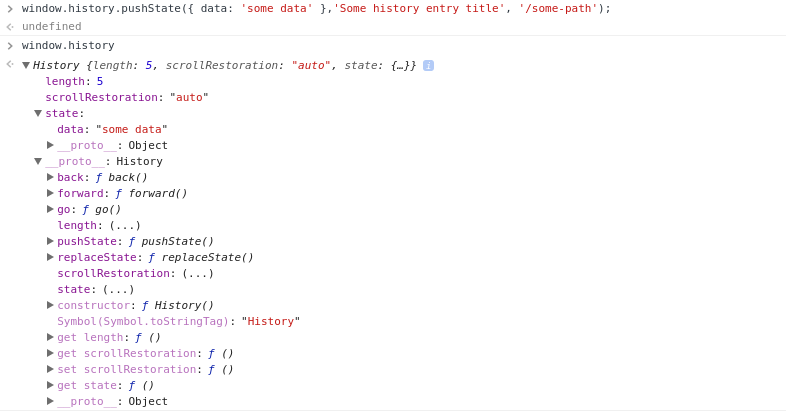
window.history.pushState({ data: 'some data' },'Some history entry title', '/some-path');
We can test out the above by opening up a website in Chrome, and pasting it into the console inside of Chrome’s developer tools. You should see that the URL changes from whatever it was to ‘<website-base-url>/some-path’.
Now, if you type the command window.history into the console, you will see that the history object has been updated with this new entry, including the state object which we passed it, and the title.

Note that the title we pass in as an argument will not be used as the page title in most browsers, and is just used as an ‘advisory’ title for this history entry.
Also, note that we can navigate backwards and forwards from ‘/some-url’ using the browser navigation buttons.
Now that we have had a look at routing basics, including history.pushState, we are ready to implement a simple Vanilla JS application with basic routing.
Implementing a simple app
Our ‘app’ will just consist of an index.html containing the following code:
<html>

<head>
  <title>Client Side Routing Demo</title>
</head>

<body>
  <header>
    <ul>
      <li><button>Home</button></li>
      <li><button>About</button></li>
      <li><button>Contact</button></li>
    </ul>
  </header>
  <div>
    <h1>Hello!</h1>
  </div>
</body>

</html>
Ok, so its a pretty basic application - in fact for now it is just a HTML template.
To serve our application, we will use an npm package called http-server-spa. This package is similar to http-server, but will allow us to fall back to serving up index.html if a route does not match any resource on the server. This behaviour is the usual behaviour of a single page application, and will prove useful for the purpose of this tutorial.
To install http-server-spa, run:
npm install http-server-spa -g
Now, to run our application, from the root of your project run:
http-server-spa . ./index.html
This will server the current folder, with index.html as a fallback.
If you navigate to http://localhost:8080, you should see the application.

Implementing routing
First lets create a routes.js file which will contain the routes for our application.
const routes = [
  {
    path: '/',
    template: '<h1>Home</h1>'
  },
  {
    path: '/about',
    template: '<h1>About</h1>',
  },
  {
    path: '/contact',
    template: '<h1>Contact</h1>',
  },
];
This is just an array of route objects - we will soon implement a route matching algorithm which, when the user navigates within the app, will loop through the array and attempt to match the current URL to one of these. In our implementation, we won’t worry about more advanced features like nested routes or parameterised routes just yet.
Now lets implement our router - create a file named router.js and add the following code:
class Router {

  constructor(routes) {
    this.routes = routes;
    this._loadInitialRoute();
  }

  loadRoute(...urlSegments) {
    // Attempt to match the URL to a route.
    const matchedRoute = this._matchUrlToRoute(urlSegments);

    // Push a history entry with the new URL.
    // We pass an empty object and an empty string as the historyState
    // and title arguments, but their values do not really matter here.
    const url = `/${urlSegments.join('/')}`;
    history.pushState({}, '', url);

    // Append the template of the matched route to the DOM,
    // inside the element with attribute data-router-outlet.
    const routerOutletElement = document.querySelectorAll('[data-router-outlet]')[0];
    routerOutletElement.innerHTML = matchedRoute.template;
  }

  _matchUrlToRoute(urlSegments) {
    // Try and match the URL to a route.
    const matchedRoute = this.routes.find(route => {

      // We assume that the route path always starts with a slash, and so
      // the first item in the segments array  will always be an empty
      // string. Slice the array at index 1 to ignore this empty string.
      const routePathSegments = route.path.split('/').slice(1);

      // If there are different numbers of segments, then the route
      // does not match the URL.
      if (routePathSegments.length !== urlSegments.length) {
        return false;
      }

      // If each segment in the url matches the corresponding route path,
      // then the route is matched.
      return routePathSegments
        .every((routePathSegment, i) => routePathSegment === urlSegments[i]);
    });
    return matchedRoute;
  }

  _loadInitialRoute() {
    // Figure out the path segments for the route which should load initially.
    const pathnameSplit = window.location.pathname.split('/');
    const pathSegments = pathnameSplit.length > 1 ? pathnameSplit.slice(1) : '';

    // Load the initial route.
    this.loadRoute(...pathSegments );
  }
}
The important part of the above is the loadRoute function, which has 3 main steps:
-
Attempt to match the URL to a route.
Our
_matchUrlToRoutefunction will handle this, by searching for the first route where there are equal number of segments in the route path, and for each index the segments at that index are identical. -
Update the URL shown in the browser address bar
We build a URL from the
urlSegments(which in our case come from the values hardcoded into our HTML template), and then push a new history entry with this URL usinghistory.pushState. -
Update the DOM with the template for the new route
This is done be replacing the contents of the element with the attribute
data-router-outletwith the template corresponding to the matched route. We do this usinginnerHTMLbecause it is easy. This technique is not suitable for production though, as it is makes our application vulnerable to JavaScript injection as we will discuss later.
Note that we also have a _loadInitialRoute function which gets called in the constructor of our router, and will cause the correct route to load when the user first loads the application.
Finally lets bring all of this together inside of index.js, where we will create an instance of our router, passing to it our array of routes:
// Initialise an instance of our router class.
const router = new Router(routes);
Our index.html also needs updating with our new routing functionality.
<html>

<head>
  <title>Client Side Routing Demo</title>
</head>

<body>
  <header>
    <ul>
      <li><button onclick="router.loadRoute('')">Home</button></li>
      <li><button onclick="router.loadRoute('about')">About</button></li>
      <li><button onclick="router.loadRoute('contact')">Contact</button></li>
    </ul>
  </header>
  <div data-router-outlet>

  </div>
  <script src="../js/router.js"></script>
  <script src="../js/routes.js"></script>
  <script src="../js/index.js"></script>
</body>

</html>
Note how when our navigation buttons are clicked, we load the corresponding route by calling our router.loadRoute function, passing the URL segments as individual string parameters.
Now, if you run the application again and go back to your browser, you should be able to navigate between the routes that we have created using the ‘‘Home’, ‘About’ and ‘Contact’ buttons. If you have a play around, you will also see that the browser back, forward and refresh buttons work as expected.
Additional features
The router that we have implemented is very basic. Most client side routers support more advanced features such as child routes, parameterised routes, route data resolvers, and more. We won’t look at all of these in this article, but the one that I will talk about here is extending the router to work with parameterised routes.
Implementing parameterised routes
We will update our router to support parameterised routes, using the : token to indicate a parameterised route segment. For example: /products/:productId.
First lets add a route of this form. Inside of routes.js, add the following at the end of the routes array:
const routes = [
  ...
  {
    path: '/products/:productId',
    template: `<h1>Product</h1>`,
  },
];
Once we have parameterised routes, it would be nice to be able to render our templates based on our route parameters. Lets get rid of our template property and replace it with a getTemplate function, which will take our route parameters as an argument.
const routes = [
  {
    path: '/',
    getTemplate: (params) => '<h1>Home</h1>'
  },
  {
    path: '/about',
    getTemplate: (params) => '<h1>About</h1>',
  },
  {
    path: '/contact',
    getTemplate: (params) => '<h1>Contact</h1>',
  },
  {
    path: '/products/:productId',
    getTemplate: (params) => `<h1>Product ${params.productId}</h1>`,
  },
];
Next, we need to update our algorithm for matching a URL to a route.
_matchUrlToRoute(urlSegments) {
  const routeParams = {};

  // Try and match the URL to a route.
  const matchedRoute = this.routes.find(route => {

    // We assume that the route path always starts with a slash, and so
    // the first item in the segments array  will always be an empty
    // string. Slice the array at index 1 to ignore this empty string.
    const routePathSegments = route.path.split('/').slice(1);

    // If there are different numbers of segments, then the route does not match the URL.
    if (routePathSegments.length !== urlSegments.length) {
      return false;
    }

    // If each segment in the url matches the corresponding segment in the route path,
    // or the route path segment starts with a ':' then the route is matched.
    const match = routePathSegments.every((routePathSegment, i) => {
      return routePathSegment === urlSegments[i] || routePathSegment[0] === ':';
    });

    // If the route matches the URL, pull out any params from the URL.
    if (match) {
      routePathSegments.forEach((segment, i) => {
        if (segment[0] === ':') {
          const propName = segment.slice(1);
          routeParams[propName] = decodeURIComponent(urlSegments[i]);
        }
      });
    }
    return match;
  });
  return { ...matchedRoute, params: routeParams };
}
Now, for a URL to match a route path, each segment of the route path must either match the URL segment with the same index, or start with a :, which signifies that it is a parametersied route parameter and so will take the value of the URL segment with the same index.
After a route is matched, we pull out the route parameters into an object. The key for each parameter is the value following the : in the parameterised route segment, and the value is the URL segment with the same index as that parameterised route segment.
We also need to update the last line of our loadRoute function, in order to wire everything up and render the templates for each route with its route params.
loadRoute(...urlSegments) {
  ...
  routerOutletElement.innerHtml = matchedRoute.getTemplate(matchedRoute.params);
}
Finally, we will add some product buttons inside of index.html in order to test out our parameterised route:
  <header>
    <ul>
      ....
      <li><button onclick="router.loadRoute('products', '1')">Product 1</button></li>
      <li><button onclick="router.loadRoute('products', '2')">Product 2</button></li>
    </ul>
  </header>
Now if you run the application again, you should see that these new product buttons load our parameterised route. If you type in a URL of the form ‘/products/x’ into the address bar, the string ‘Product x’ will display in the page heading.
The above statement actually has some pretty serious security implications which I will touch on here.
Parameterised routes XSS vulnerability
As I have already mentioned, this is not intended to be a production grade router. Apart from the fact that it is missing a number of features, it is vulnerable to JavaScript injection and XSS attacks.
We can easily illustrate how a user can inject JavaScript into our application through our parameterised route, and carry out an XSS attack. Lets examine the following HTML.
<img src="empty" onerror="alert('Damn our router is rubbish');"/>
Inserting HTML using innerHTML won’t execute any scripts that we include in a HTML string, so injecting JavaScript in that way is out of the question. However, we can attach event handlers to other HTML elements such as images in order to execute JavaScript.
If we encode our html string using this tool, we can build the following product route url from the encoded string:
/products/%3Cimg%20src%3D%22empty%22%20onerror%3D%22alert(%27Damn%20our%20router%20is%20rubbish%27)%3B%22%2F%3E
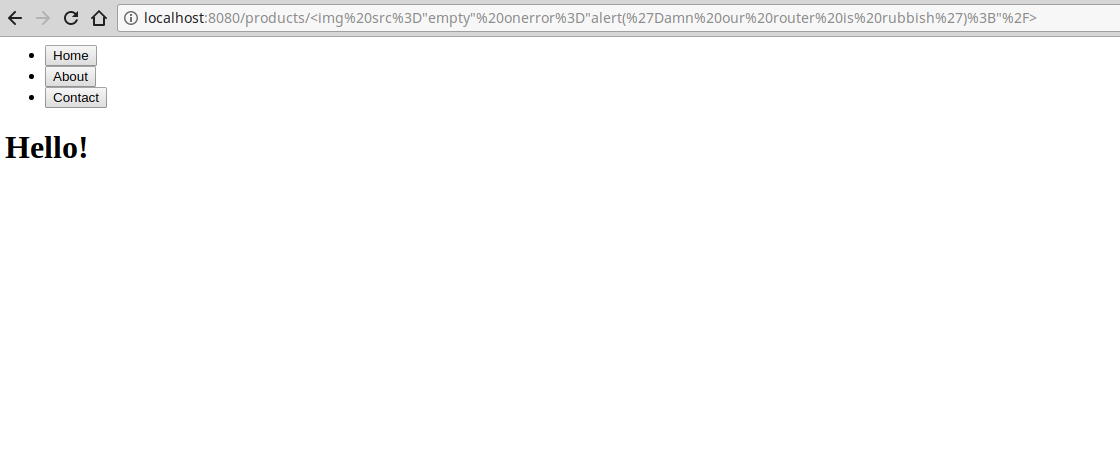
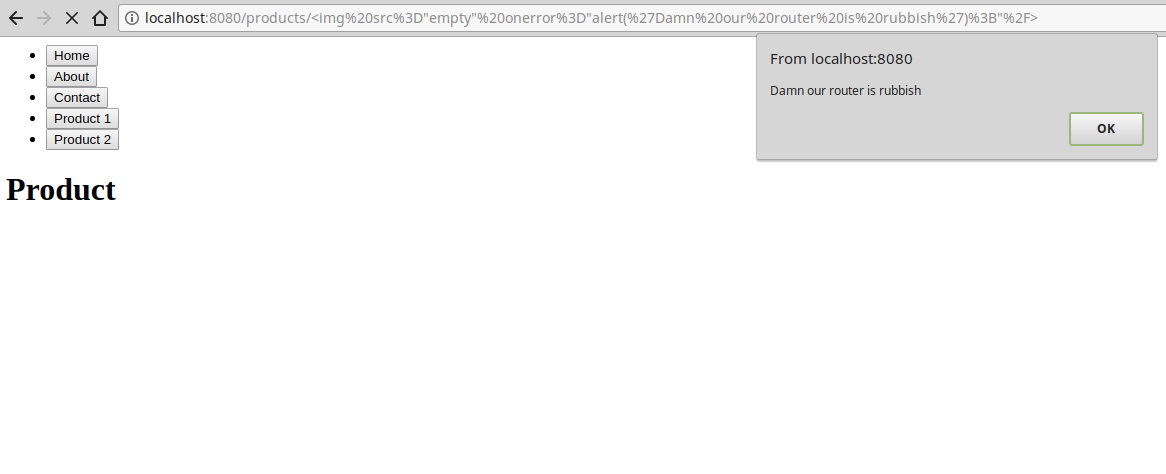
And now if we paste the above into the Chrome address bar and hit enter, lets see what happens.

Wow! That is not good, it was extremely easy to inject JavaScript into our application.
It goes to show that what we have here is a very basic implementation of client side routing. A production grade router would have sanitized the url before injecting segments of it into the DOM, in order to prevent this potential source of JavaScript injection.
Conclusion
We have explored what client side routing is, and seen how we can implement client side routing in Vanilla JS.
Our implementation is very basic, and is far from feature complete. If you are looking to learn more about client side routing then you could try to extend the router with more features, such as:
- Child routes.
- Integration with React or Hyperapp components.
- Sanitization of the URL during parsing to prevent JavaScript injection.
- A fallback (eg. 404 page) for if the URL which is navigated to doesn’t match any route.
Remember, you can find the code for the client side routing demo application in this GitHub repository.
Finally, I would like to add that I found that looking at the code for Hyperapp router really helped me to understand how client side routing works.
Helpful Resources
If you are interested in building more things with Vanilla JS, I highly recommend the following Udemy course (affiliate link):

I would also recommend this free JavaScript 30 course by Wes Bos.
In addition, the following were really helpful for writing this article, and I very much recommend them as further reading:
